With React Three Fiber
In this guide, you'll learn how to animate a 3D scene by integrating Theatre.js into
a @react-three/fiber project using the @theatre/r3f extension. For a plain
Three.js guide, see Getting started with THREE.js.
While Theatre.js is library-agnostic, extensions help you more easily integrate it with other tools, frameworks, and libraries.
Prerequisites
This guide assumes that you have a web project with a bundler set up. Don't have one? No problem, you can follow one of the popular bundler getting start guides: webpack, esbuild, Parcel, or Vite ( recommended).
Once you're set up, navigate to the folder containing the project in your terminal, and you're ready to get started.
Installing dependencies
Run the commands below to install the dependencies we'll be using.
# r3f and its dependenciesnpm install --save react three @react-three/fiber# Theatre.jsnpm install --save @theatre/core@0.5 @theatre/studio@0.5 @theatre/r3f@0.5# Three.js types (when using Typescript)npm install --save-dev @types/three
Want to use yarn?
# r3f and its depsyarn add react three @react-three/fiber# Theatre.jsyarn add @theatre/core@0.5 @theatre/studio@0.5 @theatre/r3f@0.5# Three.js types (when using Typescript)yarn add --dev @types/three
R3F starter code
We will start with the following simple r3f code, and then we'll see how we can add Theatre.js to it.
The code in this guide is TypeScript. You can follow along in JavaScript by removing the type annotations.
To start, we'll create a main.tsx file containing the code in the code block below.
For example, if you're using the vite react-ts starter, you can replace the entire contents
of the main.tsx file with the following:
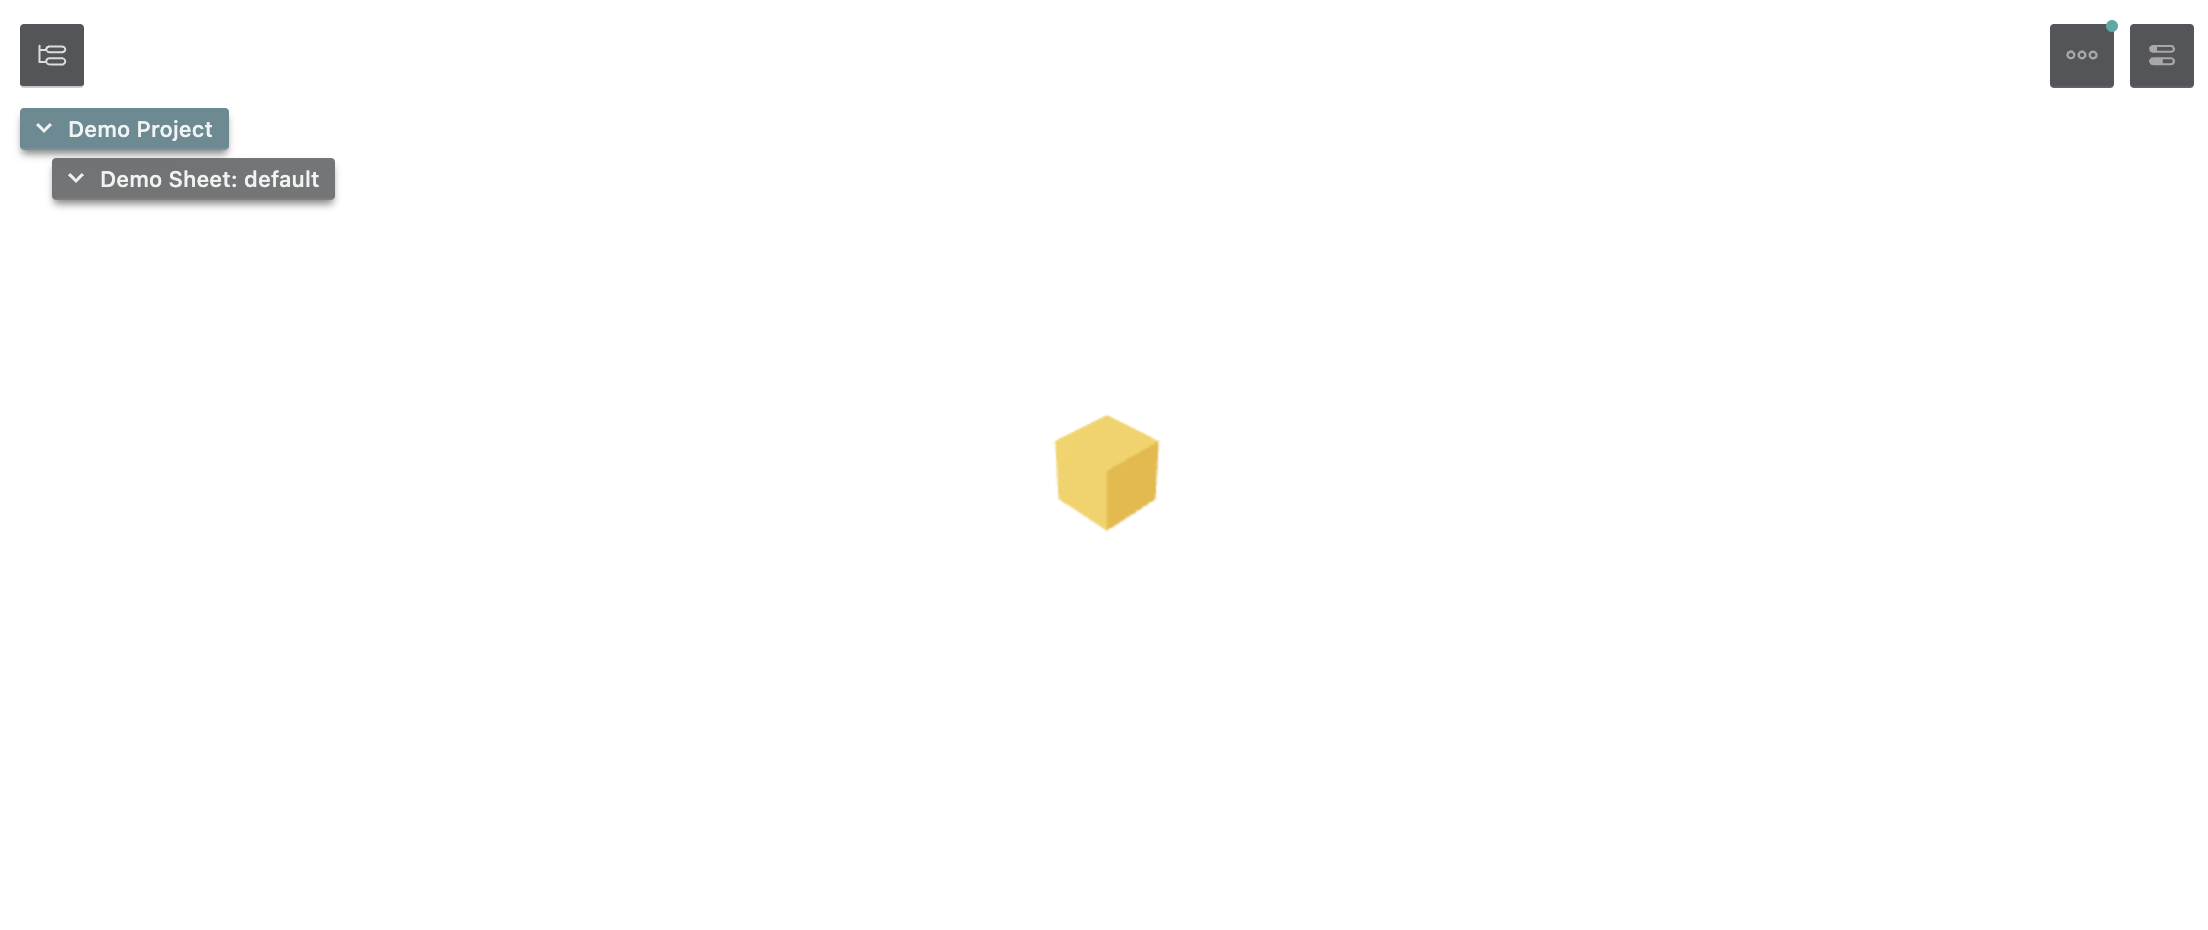
import * as THREE from 'three'import { createRoot } from 'react-dom/client'import React, { useRef, useState } from 'react'import { Canvas, useFrame } from '@react-three/fiber'import { getProject } from '@theatre/core'// our Theatre.js project sheet, we'll use this laterconst demoSheet = getProject('Demo Project').sheet('Demo Sheet')const App = () => { return ( <Canvas camera={{ position: [5, 5, -5], fov: 75, }} > <ambientLight /> <pointLight position={[10, 10, 10]} /> <mesh> <boxGeometry args={[1, 1, 1]} /> <meshStandardMaterial color="orange" /> </mesh> </Canvas> )}createRoot(document.getElementById('root')!).render(<App />)
Tip: To make the canvas full-screen, you can add the following rules to your CSS: height: 100vh; margin: 0;
Once you've saved, ran your bundler, and opened the bundled webpage in your browser, you will see something like the following screenshot:

Adding the Studio UI
Now, let's add Theatre.js Studio, the Theatre.js GUI that enables you to edit your scene and animations while developing your project.
Add the following lines below the other imports in main.tsx to initialize
Theatre.js Studio.
import studio from '@theatre/studio'studio.initialize()
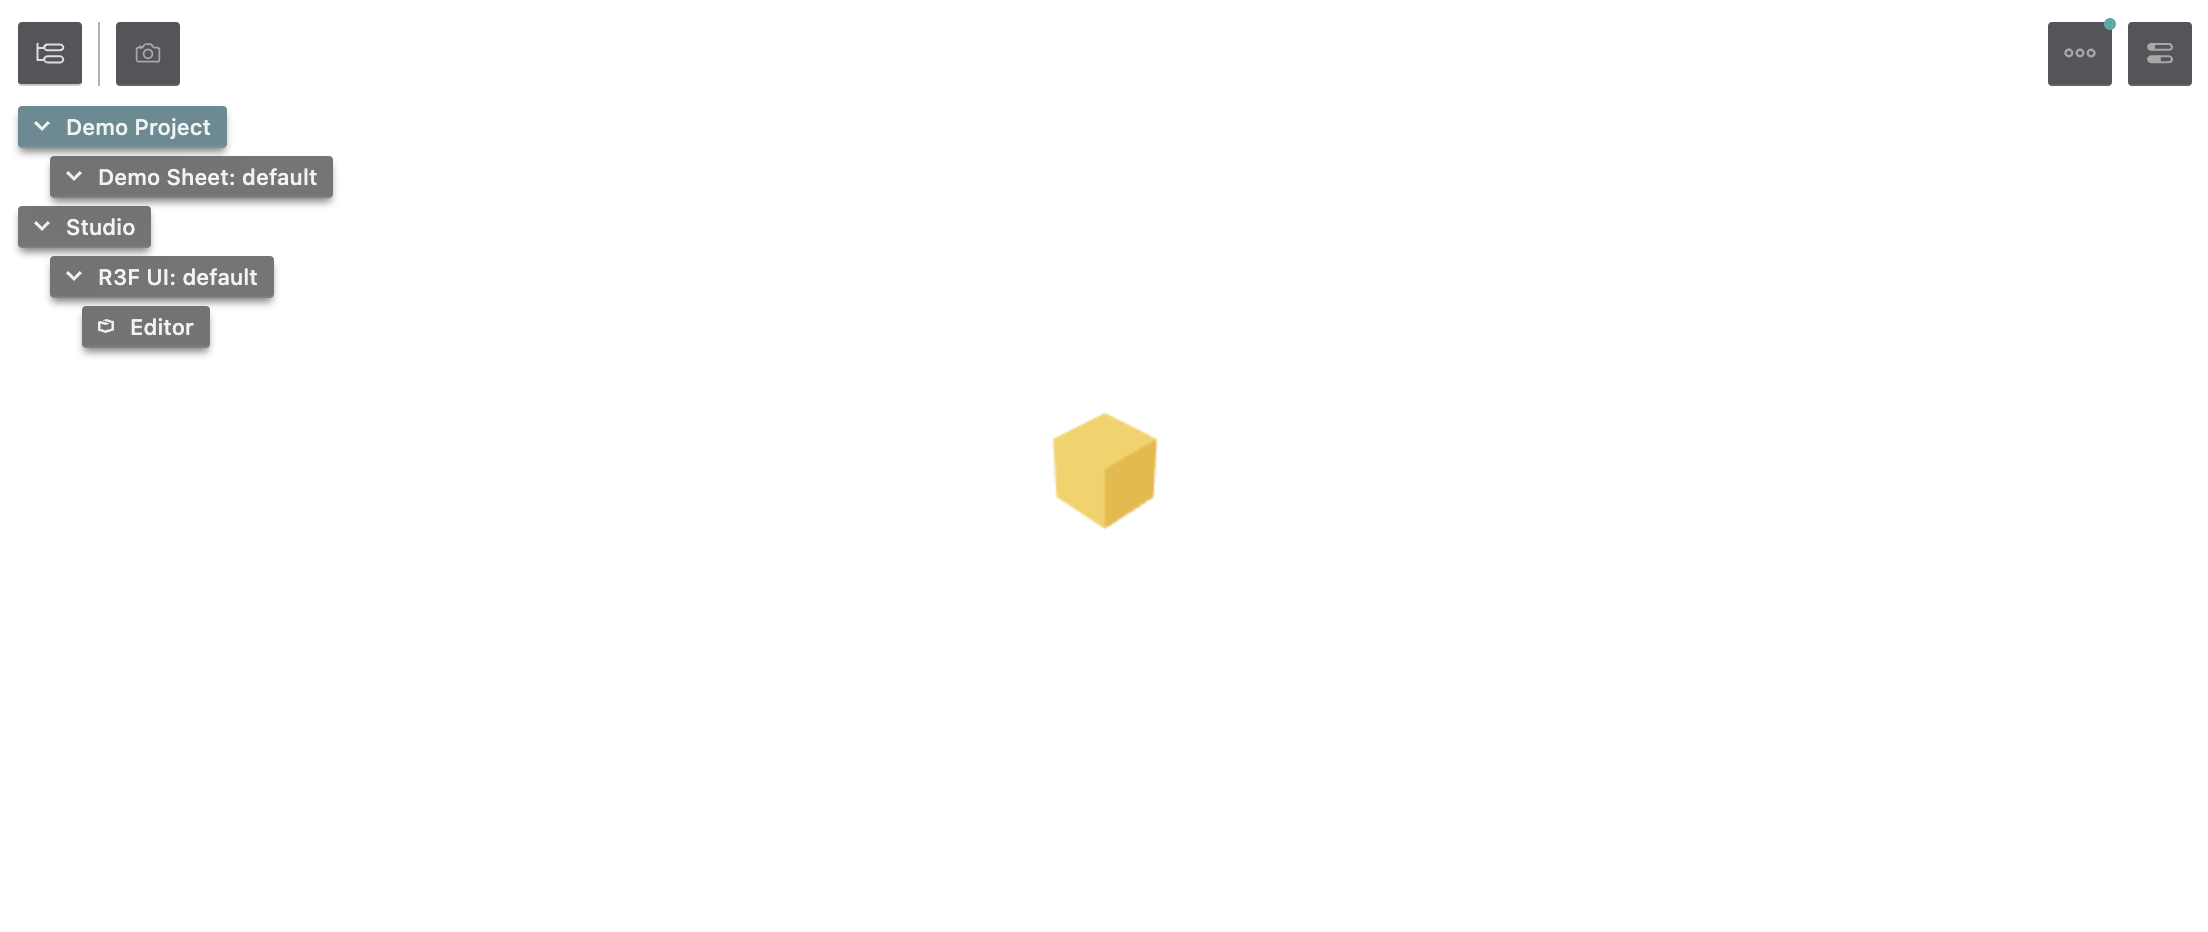
You will now see the Studio appear on top of your webpage. However, the r3f extension is still missing. Let's add the extension by calling studio.extend:
import studio from '@theatre/studio'import extension from '@theatre/r3f/dist/extension'studio.initialize()studio.extend(extension)
You can call studio.extend as many times as you want, once for any extension you want to use. You can even make your own extension to extend Theatre.js's capabilities.
Tip: only include Theatre.js Studio in "development" builds
If your environment supports it, you can wrap the above code in an environment check to ensure you only include Studio in "development" builds of your webpage.
// Viteif (import.meta.env.DEV) { studio.initialize() studio.extend(extension)}
// create-react-appif (process.env.NODE_ENV === 'development') { studio.initialize() studio.extend(extension)}
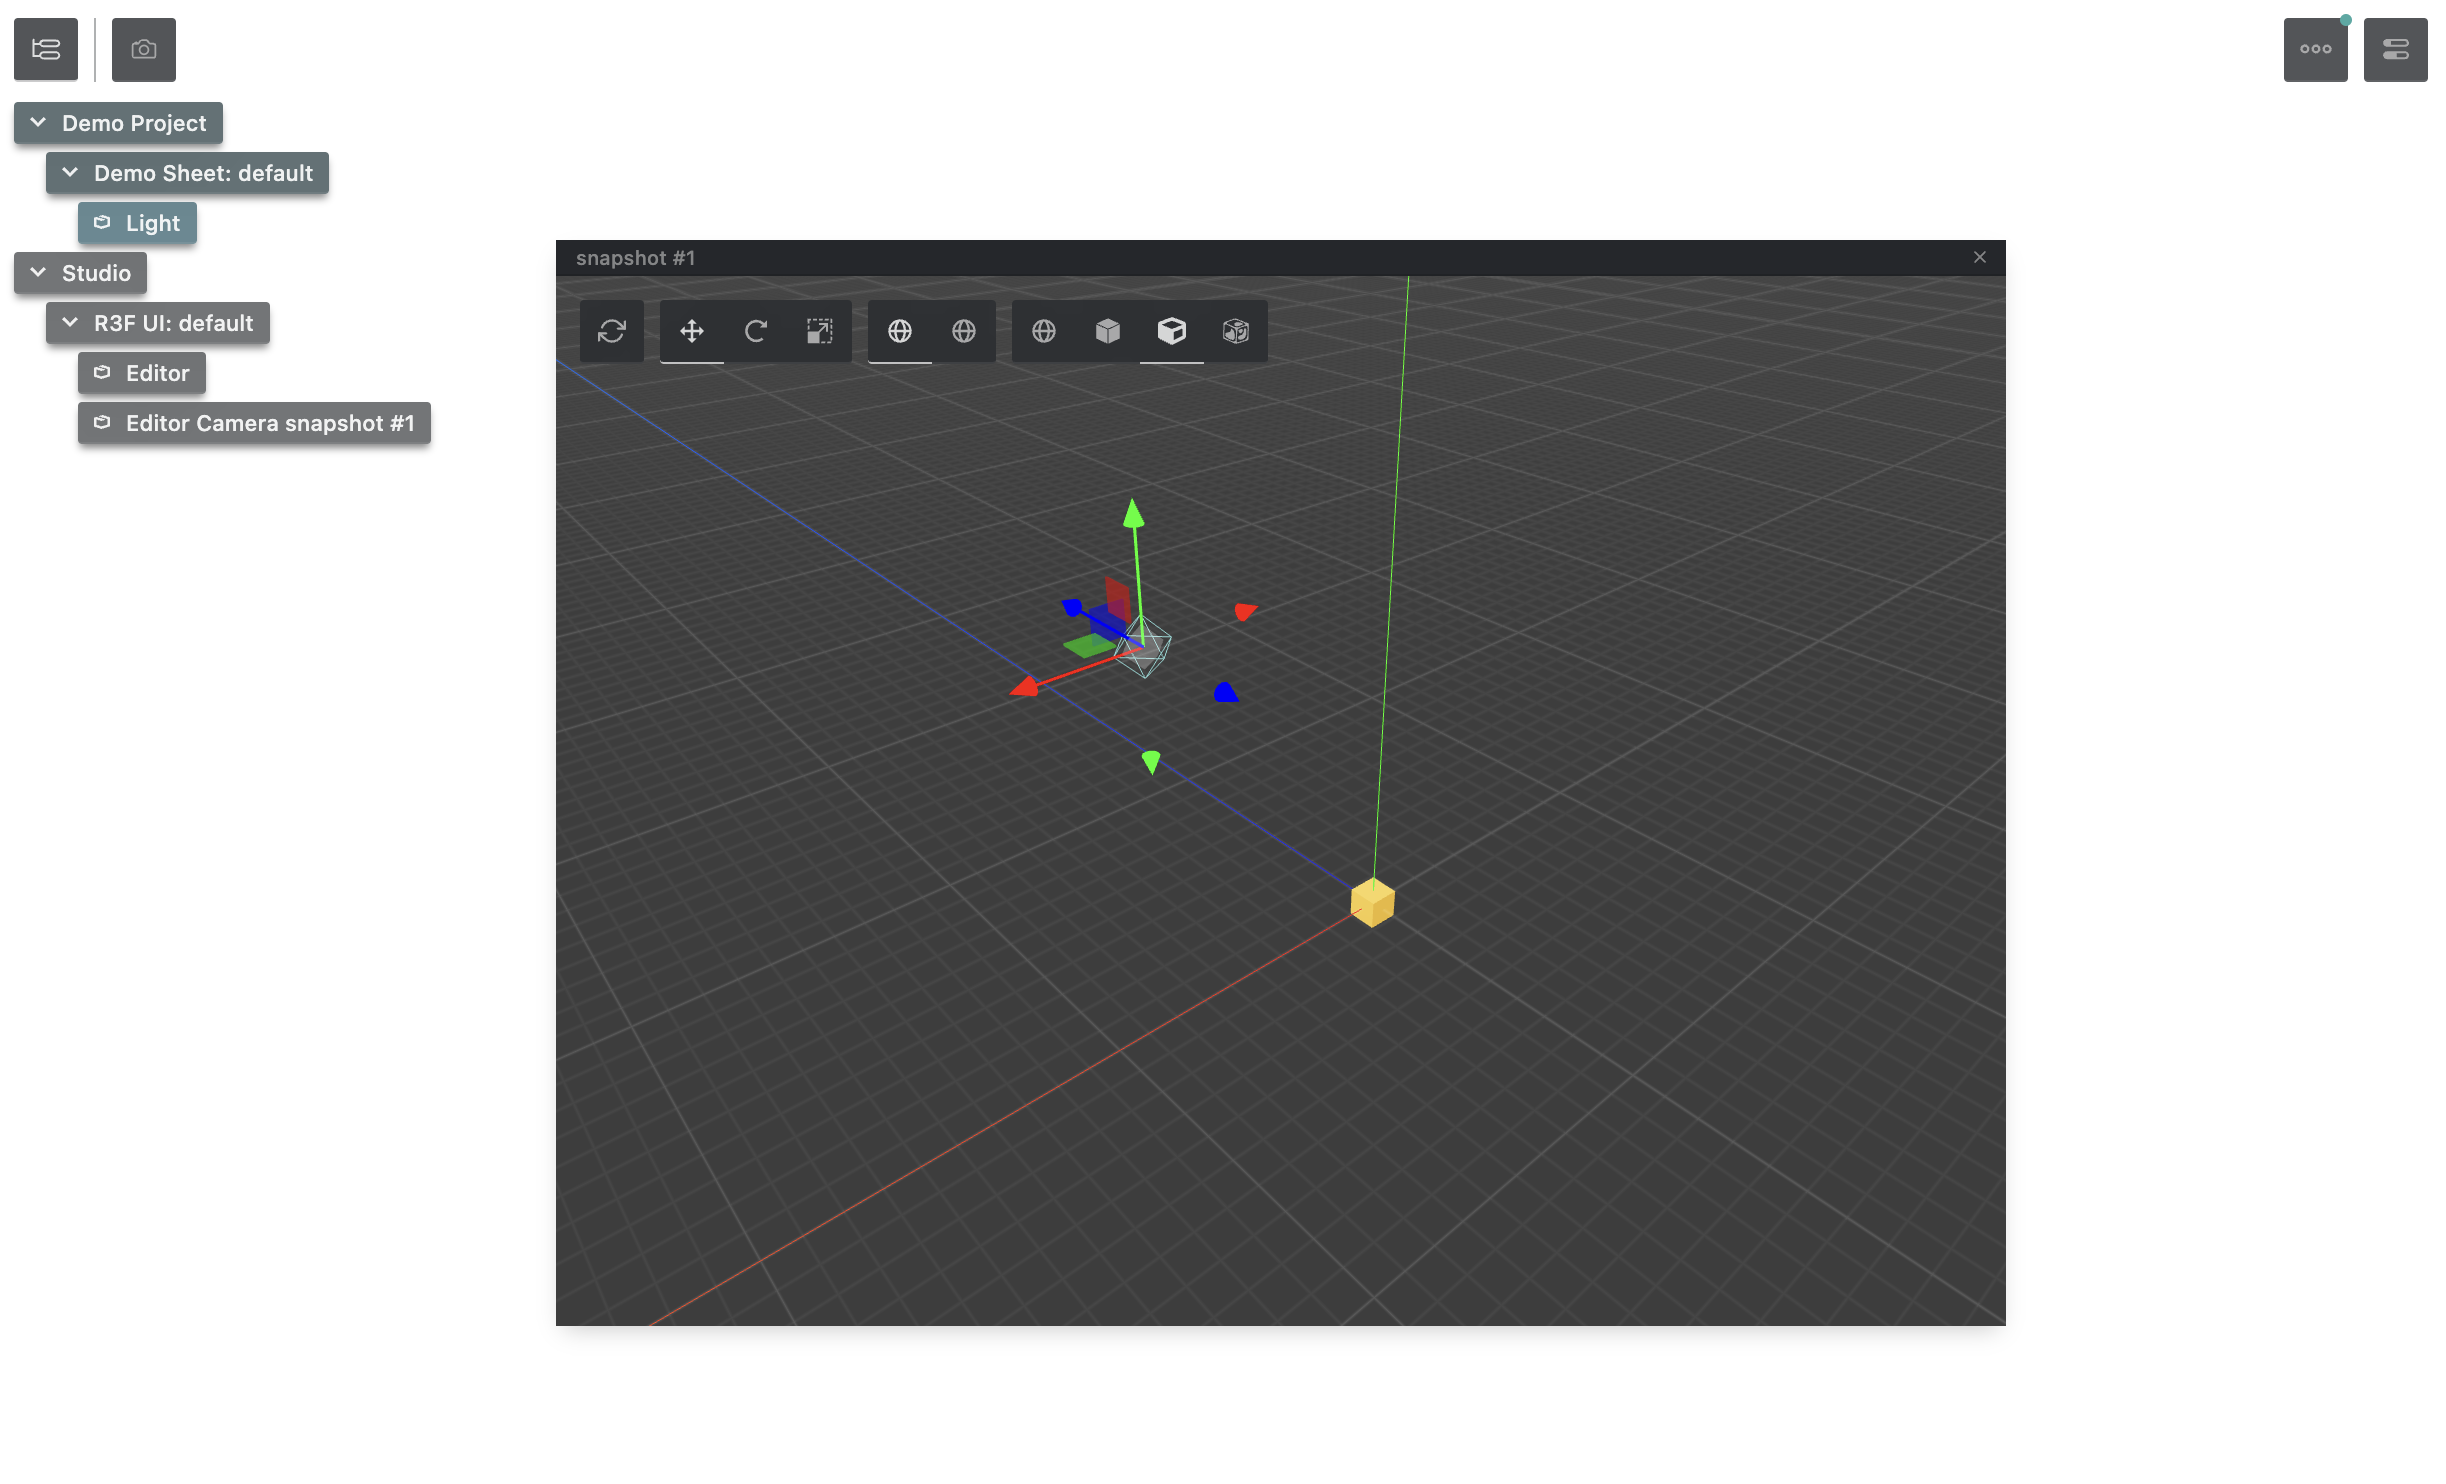
After extending Theatre.js with the r3f extension, a new button will appear in the top left of the UI:
Clicking on it will bring up the scene editor, but the editor will contain an empty space because it is not connected to our scene yet.
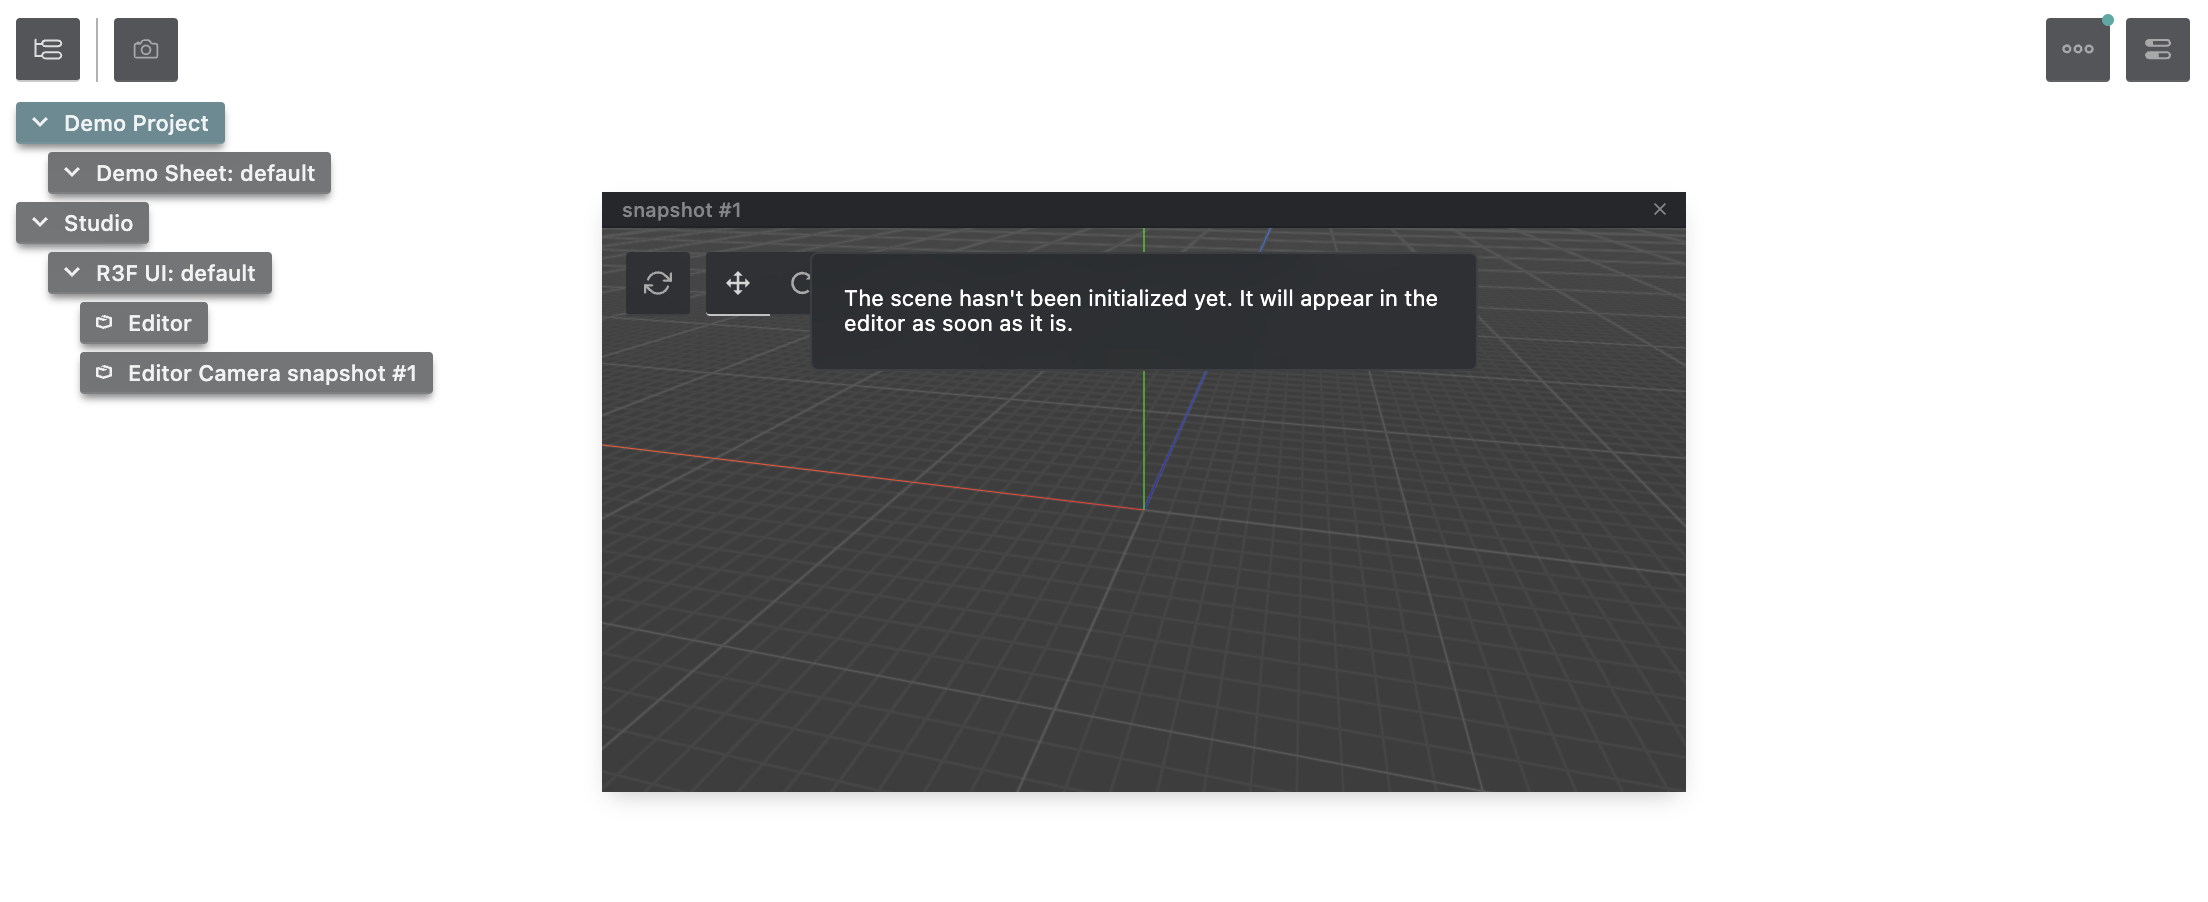
We can connect our scene to the r3f extension by wrapping our r3f scene in a SheetProvider component, which will make the scene visible in the editor. Let's do that.
Add an import of SheetProvider from @theatre/r3f:
import { SheetProvider } from '@theatre/r3f'
Then, add a wrapping <SheetProvider sheet={demoSheet}> with reference to the demoSheet from above:
<Canvas camera={{ position: [5, 5, -5], fov: 75, }}> {/* Provide sheet created earlier with `const demoSheet = getProject('Demo Project').sheet('Demo Sheet')` */} <SheetProvider sheet={demoSheet}> <ambientLight /> <pointLight position={[10, 10, 10]} /> <mesh> <boxGeometry args={[1, 1, 1]} /> <meshStandardMaterial color="orange" /> </mesh> </SheetProvider></Canvas>
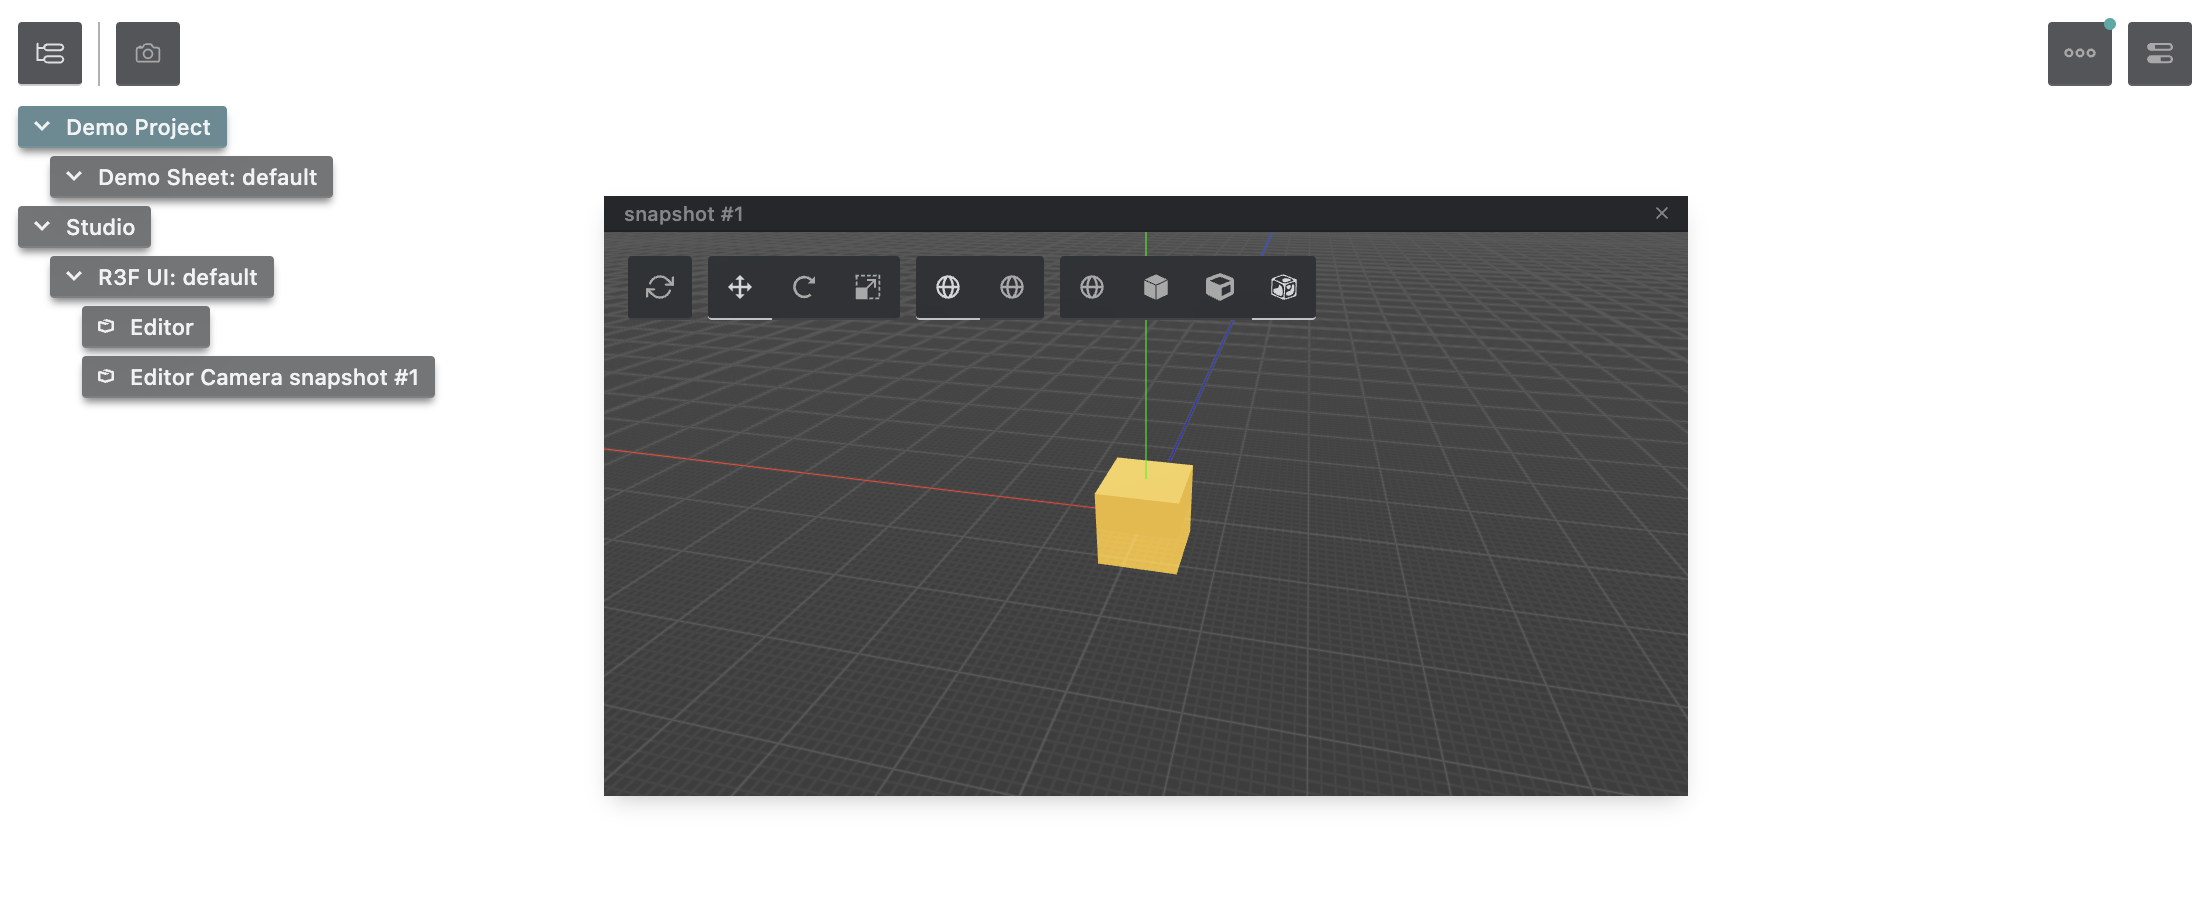
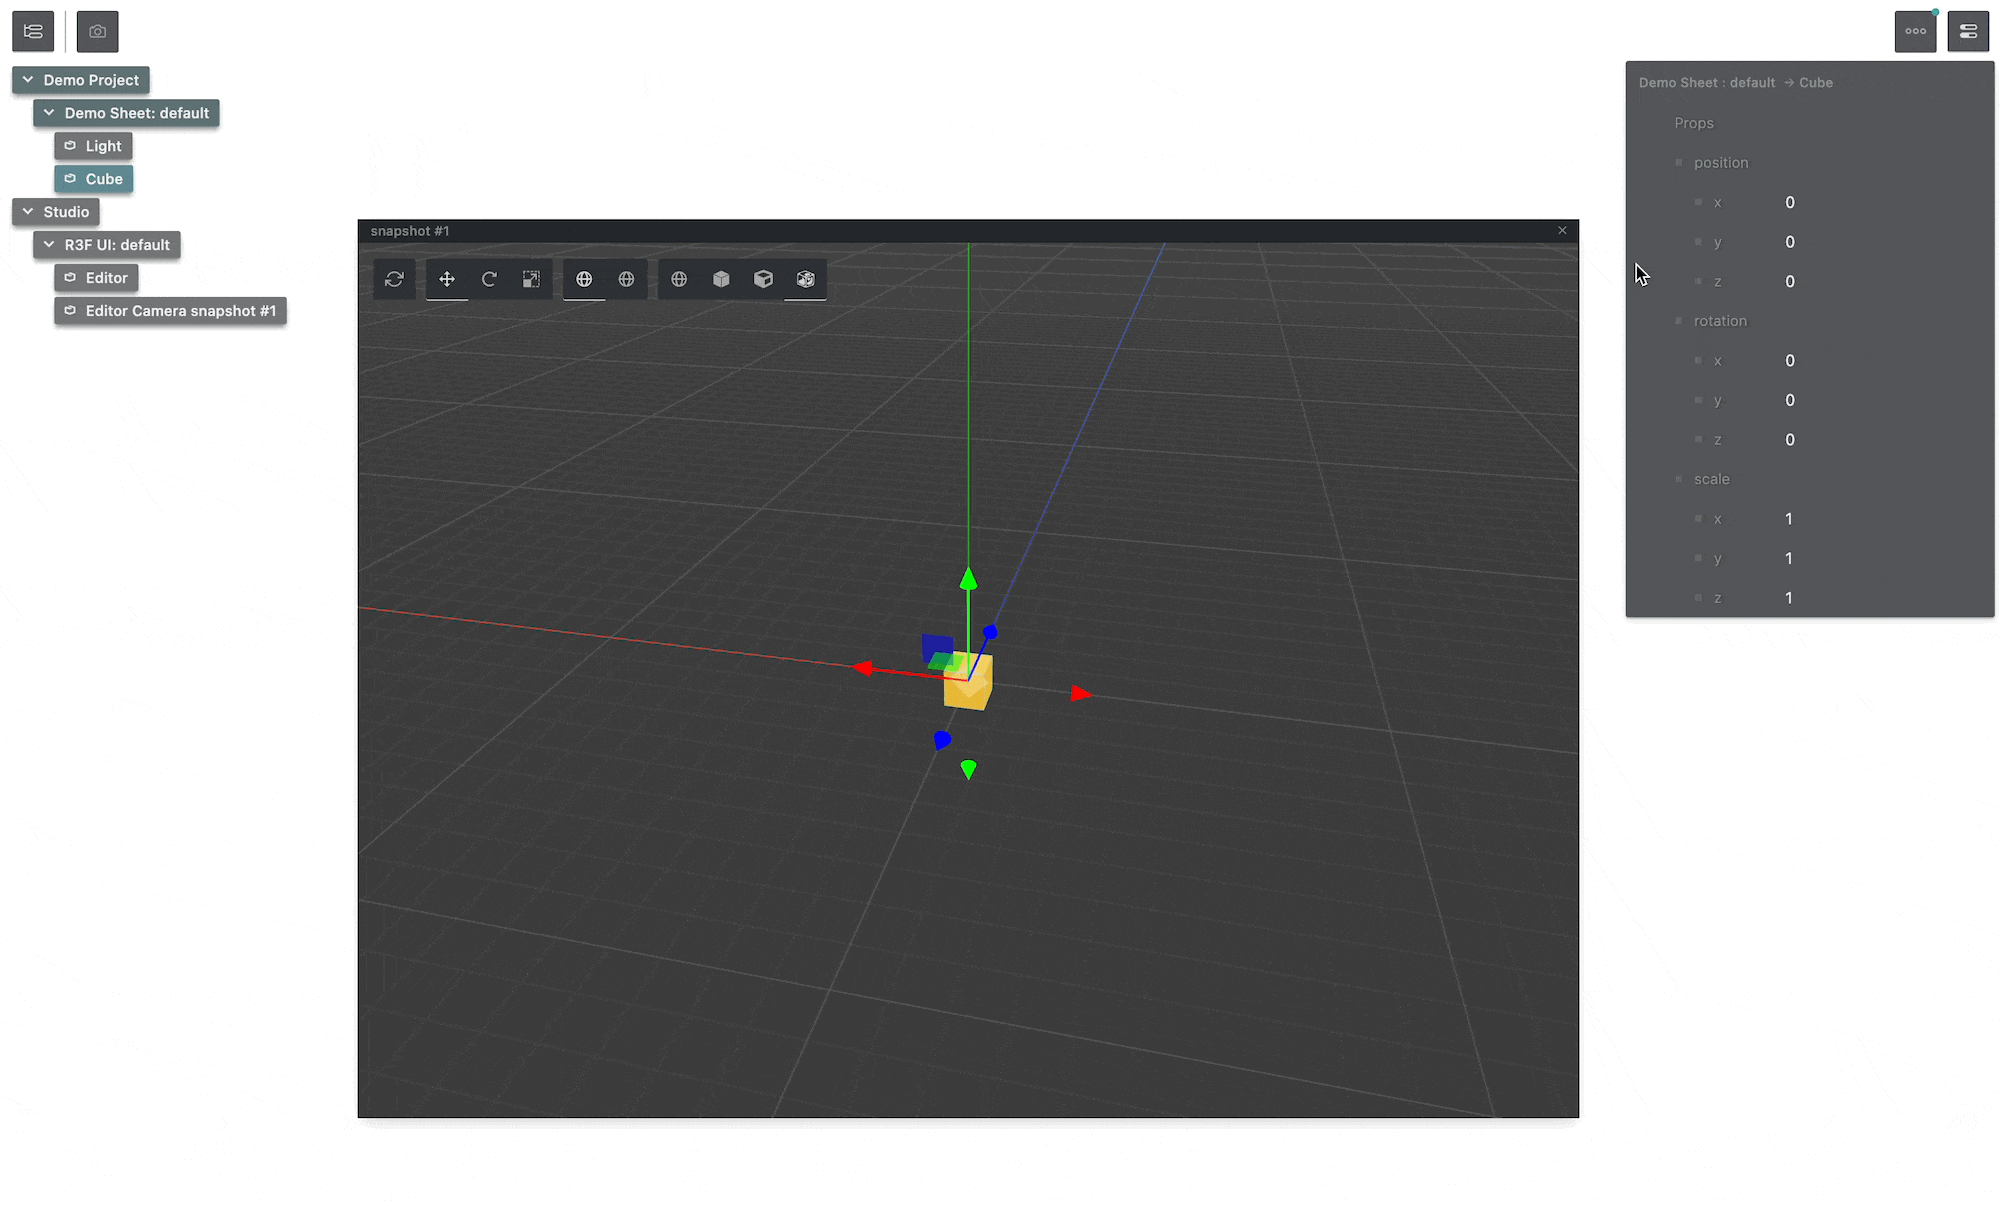
Now, our little yellow cube will show up in Theatre.js' r3f snapshot editor:
Making objects editable
While we can now see objects and move around the scene in the editor, we cannot edit the objects yet. We need to mark objects as editable for the r3f extension to be able to instrument their values.
To make an object editable, import editable as e from the extension.
import { editable as e, SheetProvider } from '@theatre/r3f'
Then prefix the object's JSX element with e., and add the theatreKey prop.
The following code will make the point light object editable:
<Canvas camera={{ position: [5, 5, -5], fov: 75, }}> <SheetProvider sheet={getProject('Demo Project').sheet('Demo Sheet')}> <ambientLight /> <e.pointLight theatreKey="Light" position={[10, 10, 10]} /> <mesh> <boxGeometry args={[1, 1, 1]} /> <meshStandardMaterial color="orange" /> </mesh> </SheetProvider></Canvas>
We can verify that the point light object is editable by opening the scene editor and
- click-dragging on the point light to move it around, or
- clicking the object to select it, and then editing its properties in the property editor panel in the top right of the Studio UI.
We can make the cube editable in the same way:
<Canvas camera={{ position: [5, 5, -5], fov: 75, }}> <SheetProvider sheet={getProject('Demo Project').sheet('Demo Sheet')}> <PerspectiveCamera theatreKey="Camera" makeDefault position={[5, 5, -5]} fov={75} /> <ambientLight /> <e.pointLight theatreKey="Light" position={[10, 10, 10]} /> <e.mesh theatreKey="Cube"> <boxGeometry args={[1, 1, 1]} /> <meshStandardMaterial color="orange" /> </e.mesh> </SheetProvider></Canvas>
Making the camera editable is a little trickier, since just adding <e.perspectiveCamera/> will not in itself let r3f
know that you want to use it for rendering. You could import the PerspectiveCamera component exposed
by @react-three/drei and make it editable using const EditableCamera = e(PerspectiveCamera, 'perspectiveCamera'),
however this is a little convoluted for such a common task, hence @theatre/r3f exposes a PerspectiveCamera component
that you can use instead. This component exposes a makeDefault prop that you can use to let r3f know that you want to
use it for rendering, and it is also editable.
Let's remove the camera prop from the Canvas element, and add our PerspectiveCamera component from @theatre/r3f.
import { PerspectiveCamera } from '@theatre/r3f'
<Canvas> <SheetProvider sheet={getProject('Demo Project').sheet('Demo Sheet')}> <PerspectiveCamera theatreKey="Camera" makeDefault position={[5, 5, -5]} fov={75} /> <ambientLight /> <e.pointLight theatreKey="Light" position={[10, 10, 10]} /> <e.mesh theatreKey="Cube"> <boxGeometry args={[1, 1, 1]} /> <meshStandardMaterial color="orange" /> </e.mesh> </SheetProvider></Canvas>
Animating objects
So far, we can move around these objects and edit their properties, but we can also animate them. To start animating, we first have to sequence the properties of an object we want to animate. To sequence properties: select an object, right-click on a property (or group of properties) in the property editor panel, and click "sequence". After clicking "sequence", the sequence editor will open. In this guide, we'll use the sequence editor to animate our cube to do a little dance.
To animate the cube's position, we'll create some keyframes by clicking in the Sequence Editor to move the playhead to a different time in the animation and then dragging the cube around or modifying its position properties. We use these keyframes to set where the cube will be at specific times in the animation.
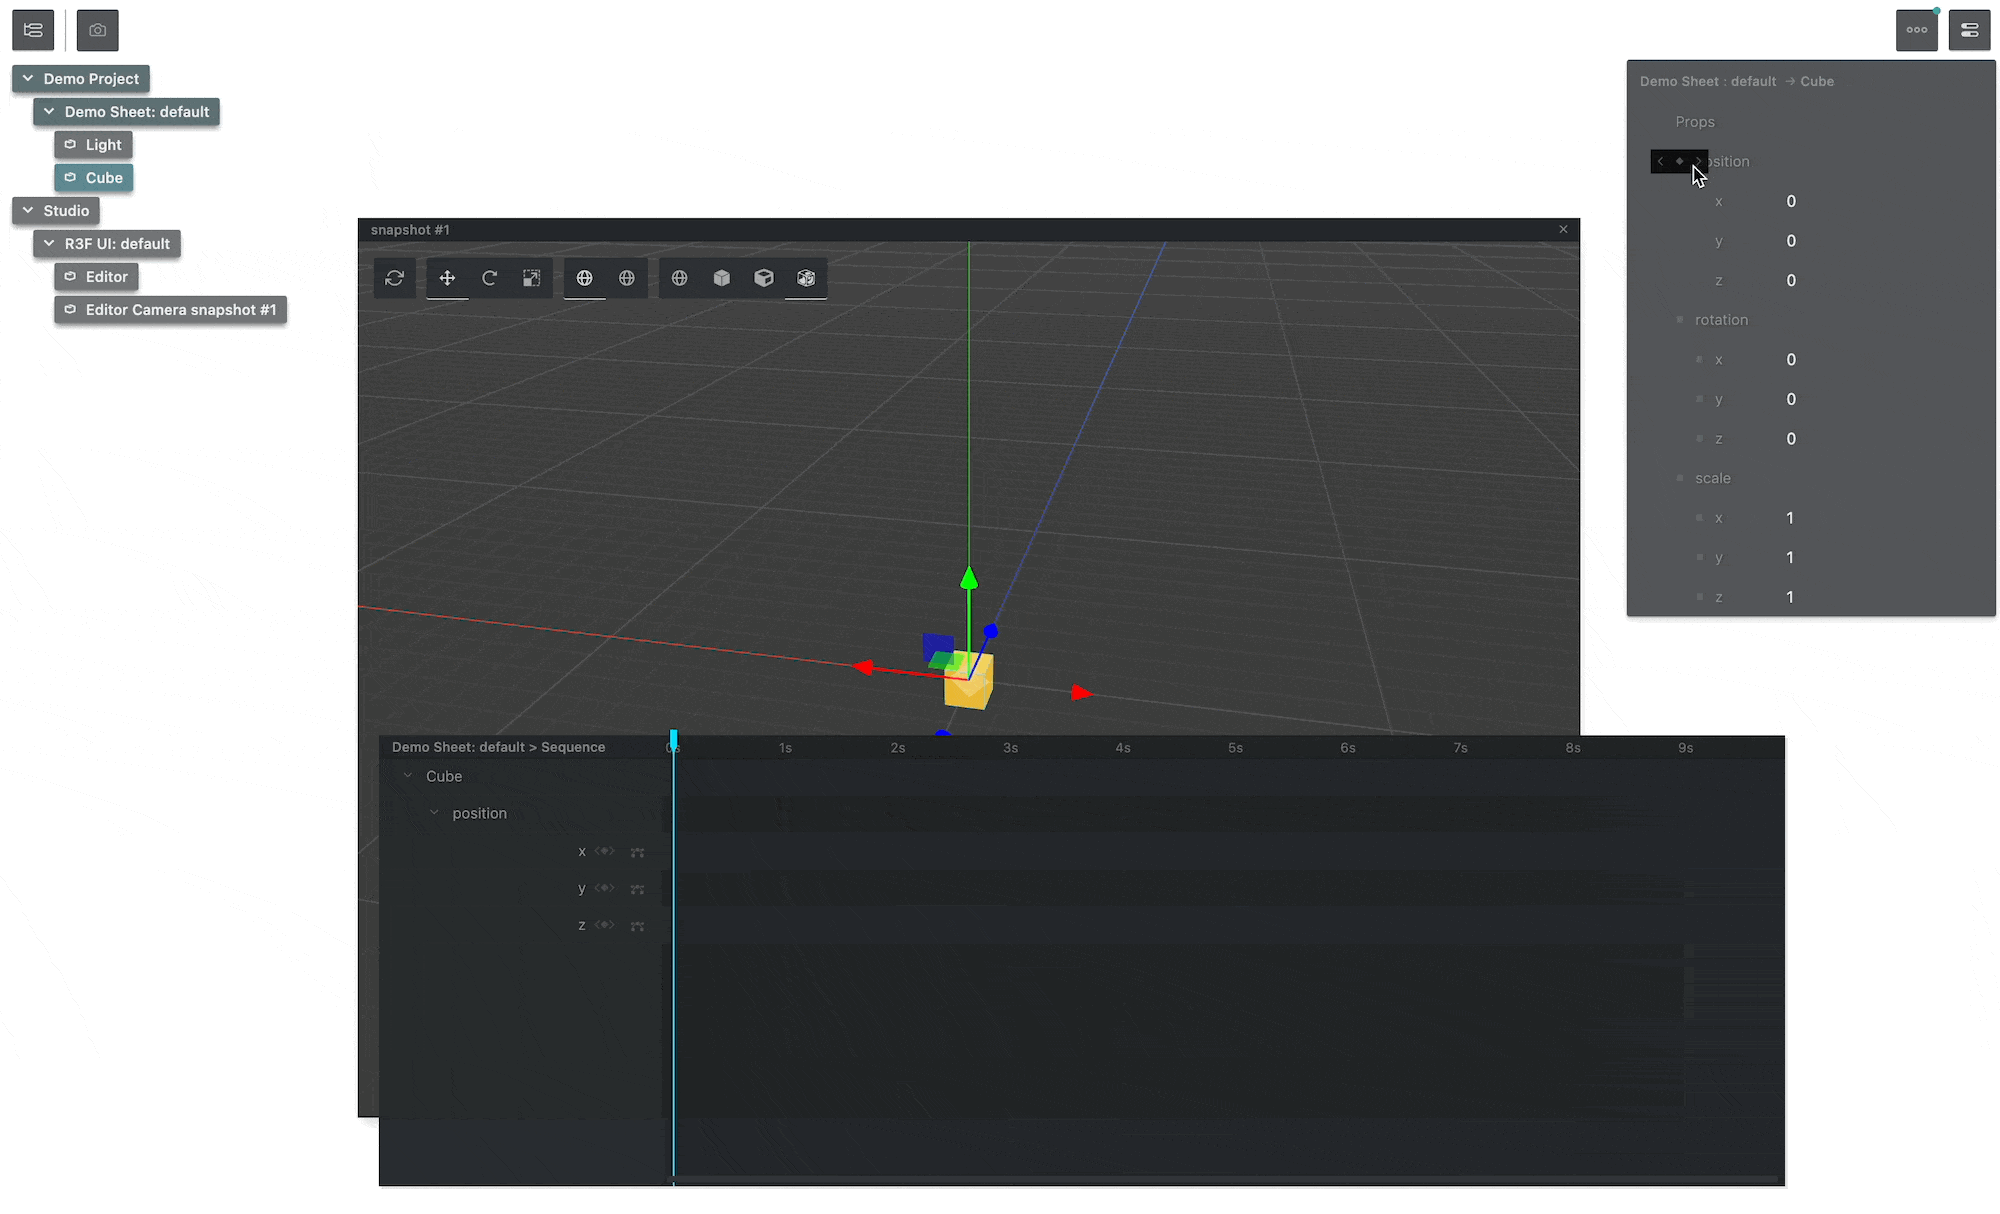
Once we have some keyframes in the sequence editor, we can play our animation by pressing Space.
Alt/Option + \.Getting ready for production
So far, we've created some keyframes in the sequence editor that result in an animation. You can preview your animation
by pressing Space.
All the keyframes you created are saved in your browser's localStorage.
So, your animation will be remembered between page refreshes.
But now you may want a way to save, share/publish, and programmatically play your animation.
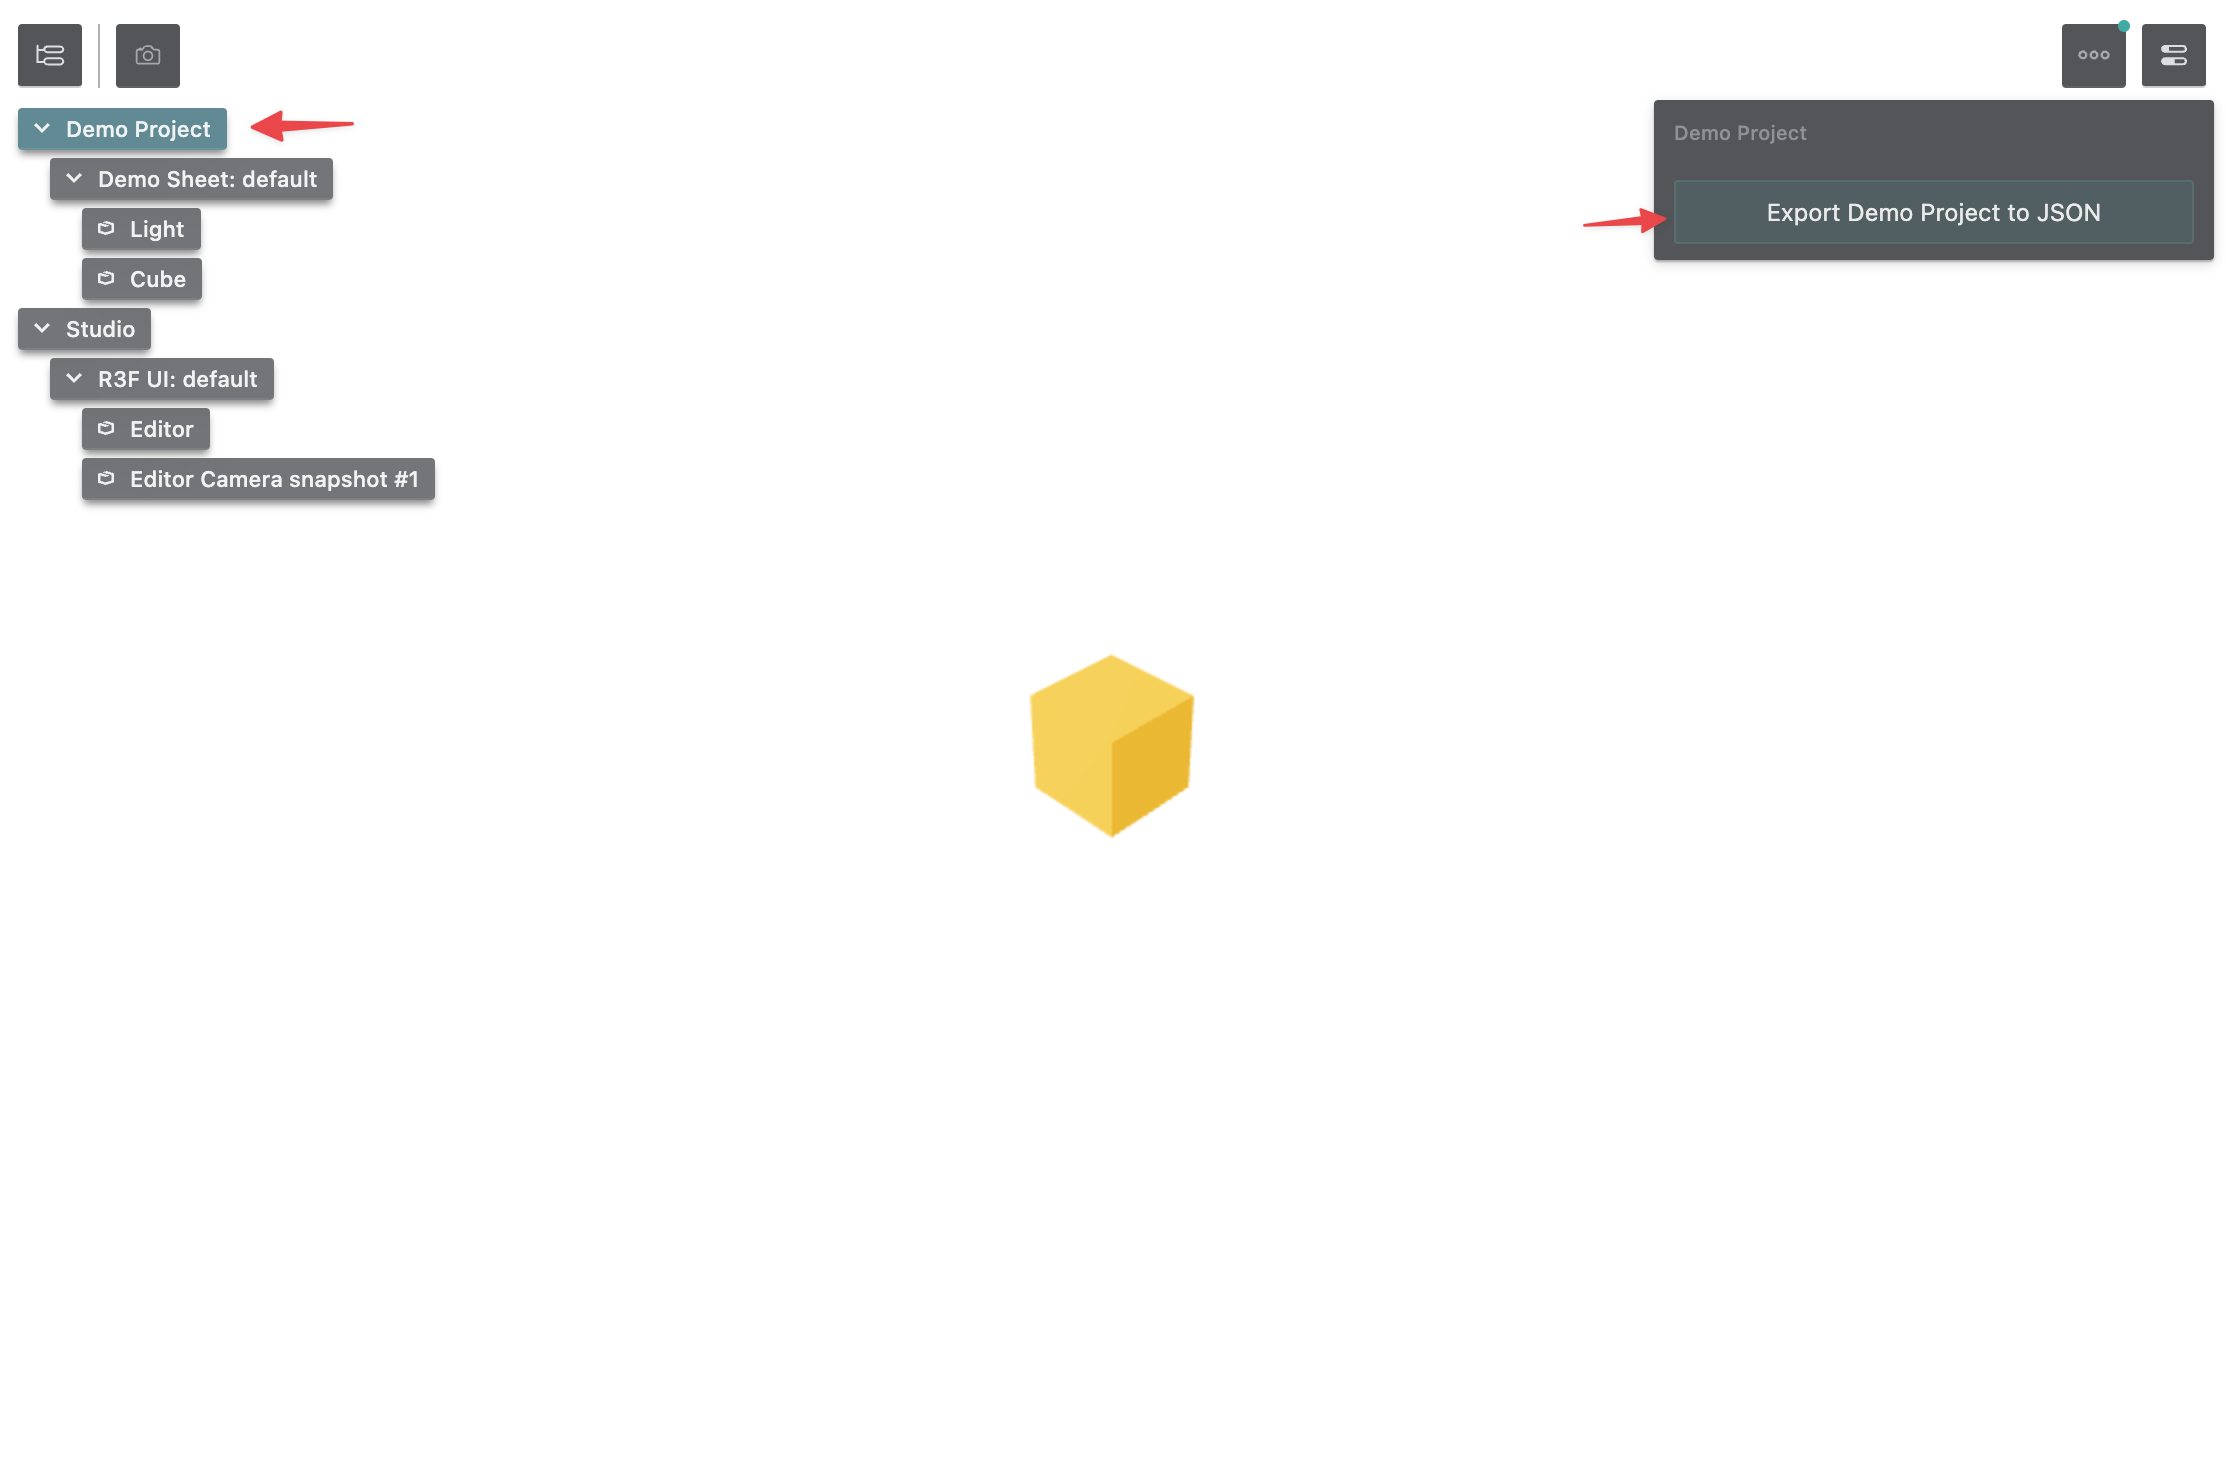
To distribute your animation as a part of your website, export your Theatre.js Project by clicking on "Demo Project" in the outline menu in the top left of the UI, and then click the "Export Demo Project to JSON" button on the right.
This will download a JSON file state.json. Now, we can move state.json to the folder containing our web project, and
import the JSON file:
import demoProjectState from './state.json'
Then replace our code from before:
getProject('Demo Project')
with this new code:
getProject('Demo Project', { state: demoProjectState })
We are now passing the saved animation state to getProject.
By doing this, The Theatre.js Project will be initialized with the saved animation from state.json instead of with the
animation saved in localStorage.
Don't worry; any changes you make to your animation in Studio will still be saved to localStorage after you do this (
your edits will still survive page refreshes).
The last thing left is programmatically playing your animation.
Perhaps you will want to play the animation when the App component mounts,
or you may want to play it in response to events like a button-click.
Here, we'll use code to play the animation in a useEffect inside our App component.
To play an animation, we need to get a reference to its sequence and call
the play method on it.
Sequence.play accepts a number of options.
Here, we are going to instruct Theatre.js to play the animation forever and in the range between the 0 second and
the 1 second mark:
const App = () => { useEffect(() => { demoSheet.project.ready.then(() => demoSheet.sequence.play({ iterationCount: Infinity, range: [0, 1] })) }, []) return ( <Canvas> <SheetProvider sheet={demoSheet}> <PerspectiveCamera theatreKey="Camera" makeDefault position={[5, 5, -5]} fov={75} /> <ambientLight /> <e.pointLight theatreKey="Light" position={[10, 10, 10]} /> <e.mesh theatreKey="Cube"> <boxGeometry args={[1, 1, 1]} /> <meshStandardMaterial color="orange" /> </e.mesh> </SheetProvider> </Canvas> )}
In summary, your main.tsx should now have the following code:
import './index.css'import { createRoot } from 'react-dom/client'import React, { useEffect } from 'react'import { Canvas } from '@react-three/fiber'import studio from '@theatre/studio'import extension from '@theatre/r3f/dist/extension'import { SheetProvider, editable as e, PerspectiveCamera } from '@theatre/r3f'import { getProject } from '@theatre/core'import demoProjectState from './state.json'studio.initialize()studio.extend(extension)const demoSheet = getProject('Demo Project', { state: demoProjectState }).sheet('Demo Sheet')const App = () => { useEffect(() => { demoSheet.project.ready.then(() => demoSheet.sequence.play({ iterationCount: Infinity, range: [0, 1] })) }, []) return ( <Canvas> <SheetProvider sheet={demoSheet}> <PerspectiveCamera theatreKey="Camera" makeDefault position={[5, 5, -5]} fov={75} /> <ambientLight /> <e.pointLight theatreKey="Light" position={[10, 10, 10]} /> <e.mesh theatreKey="Cube"> <boxGeometry args={[1, 1, 1]} /> <meshStandardMaterial color="orange" /> </e.mesh> </SheetProvider> </Canvas> )}createRoot(document.getElementById('root')!).render(<App />)
To check what our page looks like without the Studio, we can press Alt/Option + \ to hide it. Alternatively, we can
comment out studio.initialize().
Deploying to production
When we are done and ready to deploy our webpage to production, we only need to do two things.
- Make sure that we have the latest project state exported to a JSON file and passed to getProject.
- Remove studio.initialize and studio.extend.
We can also achieve the last step without manually editing the code every time by using environment-checks and relying on our bundler's tree-shaking feature:
// Viteif (import.meta.env.DEV) { studio.initialize() studio.extend(extension)}
// create-react-appif (process.env.NODE_ENV === 'development') { studio.initialize() studio.extend(extension)}
Next steps
In this guide, we walked through how Theatre.js can be used to bring animations to our R3F projects. Consider taking your project a step further by learning a more in-depth topic from our manual:
Projects
This guide covers creating projects, managing their states, saving and loading their states, and more.
Sheets
This guide covers Sheets in Theatre.js
Sheet Objects
This guide covers Sheet Objects in Theatre.js.
Prop types
Learn how to customize the props you want to animate with Theatre.js. When creating a Sheet Object, we define the props that we want to animate on it. Props can have different types which can be imported from "@theatre/core".
Working with Sequences
In this guide, we'll explore the tools that Theatre.js offers for creating animations.
Assets
Learn about assets in Theatre.js
Using Audio
Learn how to load and synchronize music or narration audio to an animation.
Studio
Learn the different parts of the Studio.
Authoring extensions
The Theatre.js Studio API enables you to define extensions that extend the Studio's UI and/or extend the functionality of Studio.
Keyboard & Mouse Controls
A catalog of controls in Theatre.js Studio.
Advanced uses
Additionally, learn more about Theatre.js' concepts. If you need any help or would like to share what you're working on with our community, please join the Theatre.js Discord.
Was this article helpful to you?
Last edited on February 01, 2024.
Edit this page